Exchange offers multiple options to Admin in order to migrate mailbox data from their existing Exchange Server 2007 to Office 365 environment. The method of migration is dependent upon multiple source environment as well as the result that the user wants to achieve.
To get the assistance for migration options and to determine the settings, Microsoft offers official online guide (Exchange Server Deployment Assistant). The user can go through the process and follow the steps to move towards Cloud servers from Exchange.
Here, in this blog you will get to know about the process to migrate Exchange Server 2007 mailboxes to Office 365. Users or Admins, who are planning this process for the first time, will surely get a good assistance from here. There are multiple options offered by Microsoft to migrate Exchange Server to office 365, and in this blog you will get to know about Cutover migration, which is the easiest way to get all your existing emails into Office 365.
What is Cutover Migration?
The Cutover migration process is basically for those users who want to migrate their complete environment at one time. The migration limit of this process is less than 2,000 mailboxes; therefore it is used by small to medium-sized business customers. Let’s see the migration steps:
Preparation of Migration:
In order to initiate the process, first use Exchange Deployment Assistant as a guide for all migrations. Here all the steps are covered to migrate Exchange 2007 to Office 365.
Run the Exchange Deployment Assistant site, once you are done then choose Cloud Only option.

- Now, you will be asked questions to confirm the migration process, select ‘Yes’ option and click ‘Next’ button.

- Now choose version of your Exchange environment form the given list. Select Exchange 2007 and click Next.

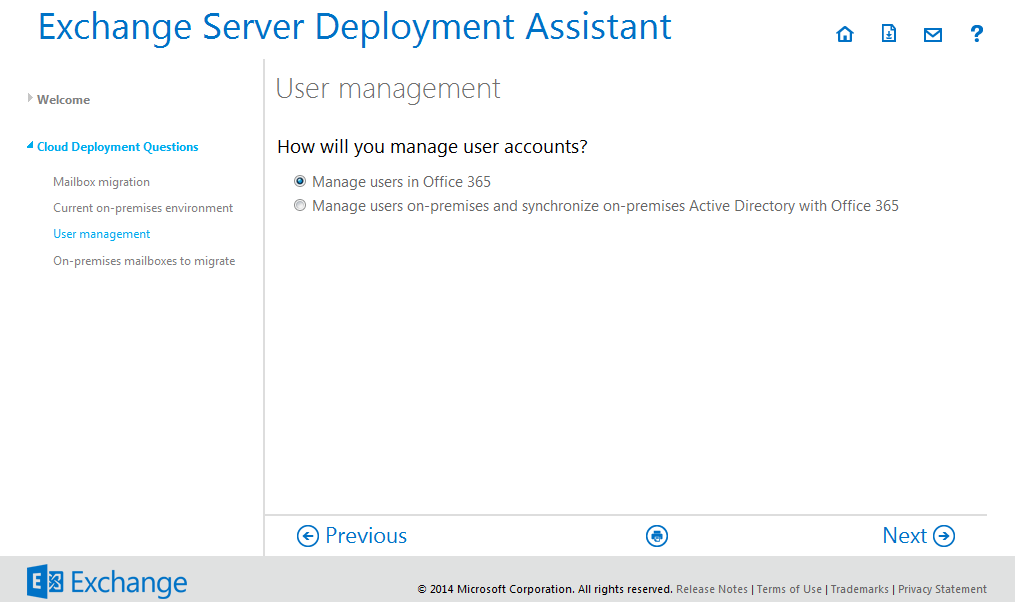
- In the next window there will be two options, you need to select any one according to your system requirement. A by default option (‘Manage users in Office 365’) is already selected, if you do not want to change it click ‘Next’.
- Now, the next question will be to provide the information about the number of mailboxes your Exchange Server hold, choose one option and click Next.

- The next window will prompt a step by step assistance to migrate all mailboxes to Exchange Online.

Test the Existing Setup
Now, by the available assistance you need to confirm that, your Exchange 2007 infrastructure is supporting Outlook Anywhere and Autodiscover. The below mentioned steps will guide you to verify the Exchange 2007 setup. After correct verification use the ‘Microsoft Remote Connectivity Analyzer’ to check Outlook Anywhere (RPC over HTTP). Double check the assigned permissions, which you have mentioned to the mailboxes that you are migrating.
Now open Microsoft Remote Connectivity Analyzer and choose Outlook Connectivity and select Next.

Enter all the needed information and choose ‘Use Autodiscover to detect server settings’ in case you are using Autodiscover to find server settings, else choose ‘Manually specify server settings’. Enter the verification code and select Perform Test to process.

Once you are done with the test and it is successful, you can continuously follow further migration steps.
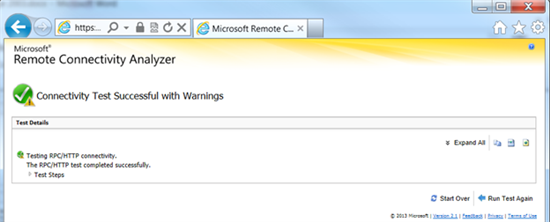
But in case the test is completed with the warning, then you need to review it and resolve the warning message if required.
Cutover Migration Setup
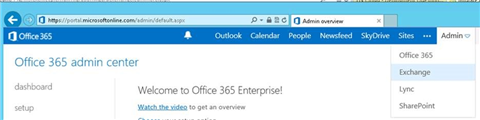
Login to the Office 365 Admin Center (https://login.microsoftonline.com/) and run Exchange Admin Center. Once you are done with the logging, select Exchange from Admin section, and click Migration.

Select the + drop down menu to choose Migrate to Exchange Online.

Choose Cutover migration option from the list of mentioned migration types and click Next.

Type on-premises account credentials and then click Next to move ahead.

Once you are done with the correct configuration, Autodiscover will solve the RPC Server as well as the on-premise Exchange Server. Click Next to proceed further.

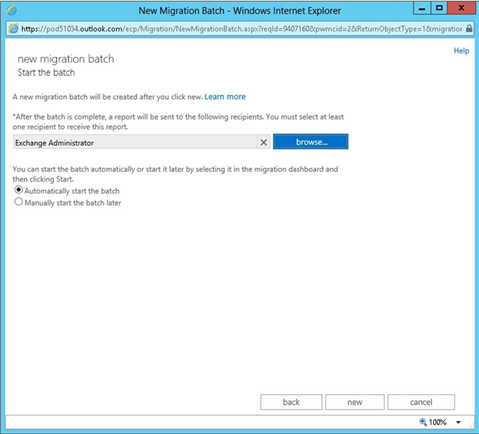
Enter the new name of migration batch and click Next button.

Once you are done with the complete migration process. Now, you can select a user account to get the report. Here, you can also choose multiple accounts to get many reports. You can do it with two options – first is ‘Automatically start the batch’, and another one is ‘Manually start the batch later option’.
‘Automatically’ option is selected when you are ready to start the migration, or ‘Manually start the batch later’ option is selected when you are not ready to start the migration. Click Next.
Now, the new migration batch is created and the status is set to syncing in Exchange Admin Center.

The time of migration is depending upon the number of accounts and the amount of data. You can view the Migration details by clicking View Details under the Mailbox Status.

Final step for completing the Migration
Once all the mailboxes and accounts are synced to Office 365 from Exchange 2007, you will receive a reporting email. Now you are all set to complete the below mentioned migration process.
- Perform Migration of Exchange 2007 public folders to Office 365.
- Assign Office 365 licenses to all users.
- Verify that all the DNS records are updated and pointed to Office 365 services.
- Configure your desktop or laptop computer to use Microsoft Office 365 services.
After completing all the above processes, you can stop the migration batch job only if all the mailboxes are migrated to Office 365 and the MX record DNS replication is done. Now, you can stop Exchange 2007 services.
That’s all you need to do for move to Office 365 from Exchange 2007!
Still if you face any difficulty in this migration process, just try our Exchange Server Mailboxes Export Tool for exporting existing .edb file/mailboxes to Microsoft Office 365.
So try the software if you’ve found Cutover migration bit hard, because I believe the software which I’ve mentioned above will surely make your job multiple times easier compared than any other manual migration process.
Let me know if you have any query related our mailbox export tool or if you want to know more about Exchange 2007 mailboxes to Office 365 migration, just post your thoughts in the below comment box.
Thanks,