
Summary: In this blog, you will learn some methods on ‘how to convert OST to PST in Outlook 2019/2016/2013/2010’. In addition, you’ll learn about an automated way to convert OST to PST file format, quickly and in a hassle-free manner.
Microsoft Outlook Offline data file (OST) is a replica of Exchange server mailbox folders on local machine. And so, it can only be accessed with the account that created it. But there might arise a case when you need to access OST file on a different machine via Outlook. This can be possible only by converting the OST file to PST format.
Some other situations that may require you to convert OST to PST are as follows:
• OST file has become inaccessible due to Exchange server crash.
• You need to access OST data when your mailbox account is either deleted or disabled from Exchange.
• You want to transfer OST file data to a different machine with POP3 account in Outlook.
| IMPORTANT! Try Stellar Converter for OST software to quicklyconvert an inaccessible or orphaned Exchange OST file to PST in few steps. It supports Batch Conversion & Repair Corrupt OST File for all MS Outlook versions: Outlook 2019, 2016, 2013, 2010, 2007, 2003, 2002, and 2000. |
Before we discuss the methods to convert OST to PST in Outlook 2016 and other versions, let’s first have a brief overview of Outlook Offline Data File (.ost) and Personal Folder File (.pst).
OST and PST Files – An Overview
OST files are created when Outlook is configured with IMAP/Exchange server. In the absence of a connection to Exchange server, OST files make it possible for the user to access mailbox data in offline mode. These Outlook data files are a valuable asset in case of server downtime or unreliable internet connection.
PST files are created when Outlook is configured to a POP account. A PST file can be used to archive older messages or items. It can also be used to create backups from any Outlook account. The backup can be used to restore or transfer data from Outlook in the event of hardware failure or to transfer data from one machine to another, etc.
Methods to Convert OST to PST
You can convert an OST to PST file format manually or by using a specialized OST to PST Converter tool. This can also be done in all versions of Outlook such as 2019, 2016, 2013, 2010 or earlier.
Convert OST File to PST Format Manually
Method #1: Archiving
Note: This method only allows moving emails to a PST file. You cannot move contacts by using this method.
Outlook email client provides the option to archive mailbox data to PST file. Thus, you can try moving the OST mailbox folders to PST file format. To do so, follow these steps:
Step 1: Launch MS Outlook application.
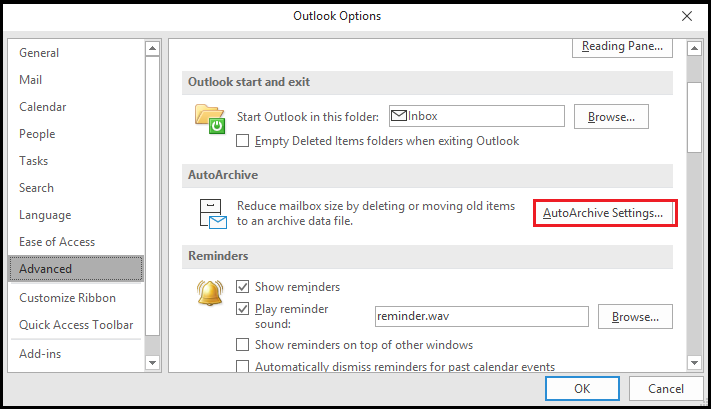
Step 2: Click File, and select Options.
Step 3: From the Outlook Options window, select Advanced, and then click AutoArchive Settings
Step 4: In the AutoArchive Settings window, perform the following:
- Add the number of days for which you want to run AutoArchive.
- Select the period for deletion of old items.
- Click Browse and select the desired location where you want to save the archived (OST) file.
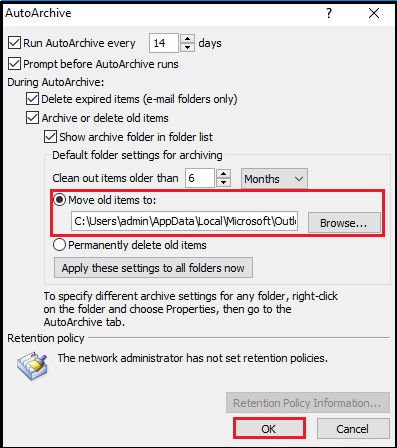
Step 5: Click OK.
The mailbox items will now get saved in PST file.
Method #2: Import/Export Wizard
Export OST data to PST file by following these steps:
Step 1: Open Microsoft Outlook 2019, 2016, 2013, 2010 or previous version.
Step 2: Navigate to the File menu, and select Import & Export.
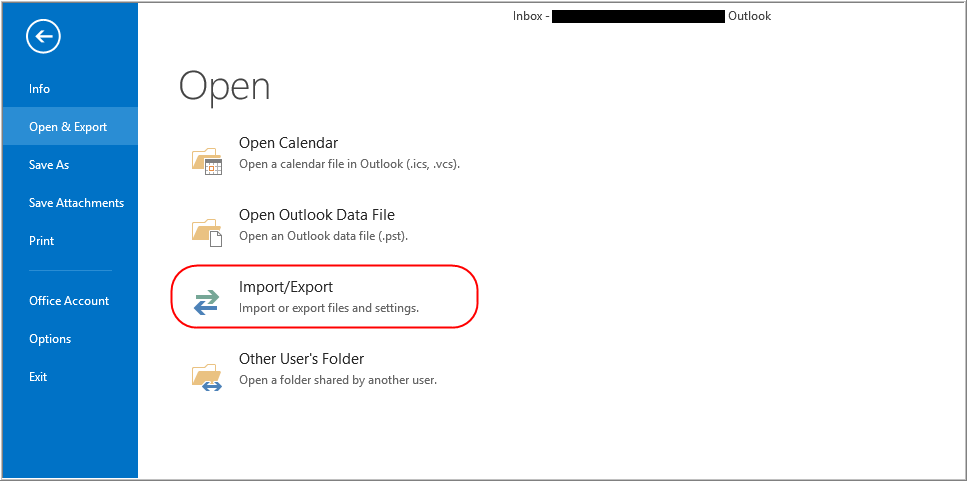
Step 3: The Import and Export Wizard is displayed. Select Export to a File.
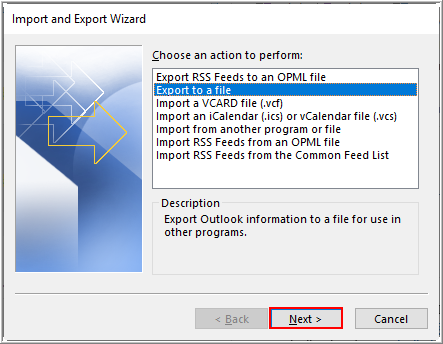
Step 4: Select Outlook data file (.pst) under ‘Create a file of type:’ section.
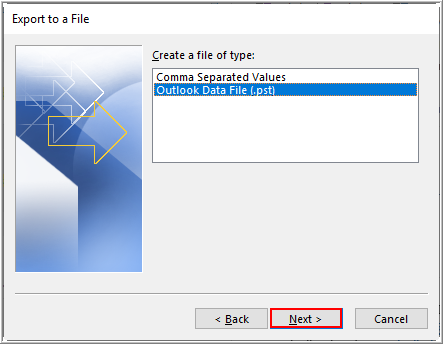
Step 5: Next, choose the files you want to export. Also, make sure to select the checkbox associated with Include subfolders.
Step 6: Browse the location where you want to save the exported data, select one of the options, and then click Finish.
NOTE:If you’ve used the ‘export to a file’ option before, then the previous folder location and the file name will appear in the ‘Save exported file as’ textbox. If so, make sure to assign a different file name.
Outlook will begin the export process unless you’ve created a new Outlook data file (.pst) or used an existing password-protected PST file.
- If you wish to provide a password to. PST file, type password in the Create Outlook data file box and then click OK. The Outlook data file password box will appear, type the password and click OK. You can skip this optional step (if required).
- If you’re exporting the data to an existing password-protected PST file, then in the Outlook data file password dialog box, enter an appropriate password and click OK.
Now, once the mailbox data is available in PST file format, it can be transferred or moved to a new location in your computer or an external storage drive.
Method #3: Drag and Drop the Items to a New PST File
Create a new Outlook data file (.pst) for your existing Outlook profile and drag the mailbox folders you want to move to the newly created PST file. However, you cannot drag default folders such as ‘Inbox’, ‘Contacts’ and ‘Calendar’. For these folders, you will need to copy them from OST file into the PST file.
The above discussed manual methods have certain limitations:
• They are time-consuming.
• They won’t work if the OST file has turned inaccessible or orphaned.
• Data integrity may be at risk.
• Performing manual steps has the potential for human error.
• They do not guarantee complete conversion of OST mailbox items.
• No option to preview converted mail items.
Convert Outlook OST File to PST by using OST PST Tool
You can overcome these limitations by using an automated solution to perform the conversion. Stellar Converter for OST software is purpose-built to make OST to PST conversion a quick and hassle-free process, without data loss risk. It can help you convert inaccessible or orphaned OST file to PST.
Further, the software extracts complete mailbox data from OST file including emails, attachments, contacts, calendar entries, etc. Also, the software provides a preview of converted mail items before saving them.

Comparison Sheet – Manual Methods vs Stellar Converter for OST

Wrapping Up
You can convert OST to PST in Outlook 2019/2016/2013/2010 and previous versions by using the manual methods discussed in this blog. However, the manual methods can be time-consuming and do not guarantee complete mailbox conversion. Also, there’s always risk of data loss when performing the manual steps. So, make sure you understand the manual steps and perform them carefully. Also, create OST file backup before proceeding with the conversion process.
However, you can simplify the process of converting OST to PST and extract the entire OST file contents quickly and safely with the help of Stellar Converter for OST software.
With the help of the OST to PST converter tool, you can easily convert email messages into multiple saving formats including EML, MSG, HTML, PDF and RTF. If the OST file is corrupt or is no longer accessible – despite using the Microsoft built-in Inbox Repair Tool (ScanPST.exe) – you can use this Outlook tool to export and save data to PST from the corrupt OST file.

Hello admin, import/export option couldn’t helped because the ost file is no longer accessible. I m not sure whether it is corrupt or anything else. How can I check if ost file is corrupt and needs to be repaired?
If it can not be accessed anymore, or it throws any error message when you try to access a OST file; probably it is corrupted. These are all the symptoms to ensure OST file is corrupted and needs to be repaired.
You should consider third party software like Stellar OST to PST Converter tool to safely repair OST file and recover and convert all the data into PST file. Check here the demo version to see how easily you can recover your OST file and convert data to a PST file. https://www.stellarservertools.com/ost-pst-converter.php
Let me know if you need further help!
Getting error 0000000E !! Is there another way to repair ost file than scanpst? Or any option that fix Outlook error code and convert my Outlook ost file items to a pst file absolutely free?
M. Islam, UAE
As far as I know scanpst.exe usually fails to repair OST file, so unfortunately there is no free method to repair and convert OST file to PST. Try Stellar tool mentioned above in the post to handle the OST file which throws such type of random error messages. This software has the ability to repair the OST from the any level of damage and saves the data in a PST file.
Very good tips to convert OST file. Demo version of the software looks so helpful. It previewed the items from corrupt OST file. Not sure if it recovers data as well !!
Working as well as corrupt OST, both type of files can be repaired and recovered/converted into PST form.
Just recovered an orphaned ost file but don’t know how to recover data from it. The file contains few confidential billing & tax sheets (mainly those attachments I want to save), so don’t wanna try R&D manual procedure…any input!!?
There are few manual procedures as well which may help you to extract particular item from OST file. But if you wanna avoid manual method, I suggest you go with Stellar OST to PST Converter tool. The software lets you recover data from the OST file in multiple saving formats like PST, Office 365 etc. One you’ve extracted the selective items like emails, contacts, attachments, calendar entries etc., from the OST file – use Outlook Import/Export option to import the file into your Outlook account.
Try the software over here: https://www.stellarservertools.com/ost-pst-converter.php
Hope, it helped!
In Outlook 2010 & 2013 environment, I’m getting the same problem – Outlook cannot be accessed!
System configuration: Outlook 2010, Exchange 2013 (OWA is working fine.). Upgraded from Outlook 2007.
Someone told me to repair OST file, tried it and partiality it worked, I mean I know the issue due to the corrupt file but I just wanted to know if the software is the last option to fix it.
Another Query: I also found an old employee’s backup in ost and the issue occurs when I try to access mailbox content, tried scanpst and recovered some mails. However I m not sure if it is accurate or completed!!?
All your help is appreciated!
I’m posting my query second time but it isn’t visible 🙁 , please respond!
Hello Jim, you got it right, the error prompts on the Outlook screen due to corrupt OST file. I have recently published few posts which cover the topic in details. I suggest you look into the related posts:
https://www.stellarservertools.com/blog/outlook-2013-2010-error-0x8004010f/
https://www.stellarservertools.com/blog/outlook-ost-cannot-be-accessed/
Comes to your another query: You can’t ensure the recovered emails using free methods are completed or accurate until you preview the OST file inbox. To do this, try out the OST to PST Converter tool I mentioned in the post and read your OST file. The software allows to save 10 items free per folder. In case you’ve got recovered emails from backup, by comparing the emails from the software preview feature, you can ensure which emails you’ve lost using free OST recovery method.
FYI, Scanpst is the only free available Outlook data files repair tool to repair corrupt OST/PST file, and in case it fails – third party software are the only solution to save data from damaged Outlook data files.
Please revert if you’ve further queries!
Thanks for sharing your concern in details.
I’ve tried stellar ost converter trial version but it is not allowing me save anything. Software prompts to enter license key, how can I get it?
You need to register/purchase the software to get the activation key. Visit our site to register for the software: https://www.stellarservertools.com/ost-pst-converter.php
Thanks,
Dear admin, where can I get free ost to pst converter tool? I only need to use this software just once. Can you provide me the license key for one-time use only?
FYI, there is no freeware ost to pst conversion tool. However, if you wanna try Stellar OST to PST Converter software for troubleshooting the OST file, you need to register the software to get the license key. Key is mandate to get the benefit of Stellar’s tool. Thanks,
Good tool for ost to pst conversion, but how to get it for free 🙂 ?
Stellar OST to PST Converter is not a freeware OST converter utility 🙂 You need to register for the license version to use the software. However, free version of OST to PST tool allows you to save 20 items free per folder saved in OST file.
How can I convert emails and contacts free?
I found that software has the feature to convert 20 items from ost file to pst completely free. So all I want to know, do I need to get free license of the software for using free feature of stellar ost to pst tool?? I need free license to use the free features, as I only need to recover some recent emails. Thanks in advance!
You don’t need any license to save 20 items. Free version of OST to PST Converter lets you save 20 items completely free, even you don’t need to register for the software.
I can only save only 20 items free from every folder, how can I convert all the emails into pst free?
To save all the items into PST, you need to purchase the software, as free version lets you save only 1st 20 items per folder.
can I set pst as default in outlook 2013 and office365??
Hi,
Experts are avoiding this practice due to the involvement of non-feasible methods.
This software supports latest Windows 10 PC. Thank you!
Thanks John for sharing your experience with us. Apart from Windows OS versions, our tool is also working on all versions of MS Outlook including 2016.