
Exchange Server failure is one of the worst scenarios an Exchange Server administrator can face as this can lead to downtime and disrupt the daily communication and activities, impacting the business operations and productivity. So, it becomes imperative to get the services back online as soon as possible and without any impact on the data and the business. In this guide, we will go through the process to recover or rebuild the Exchange Server 2016 after failure. But before going forward, let’s take a look at the possible causes that can lead to a server failure.
Common Causes of Exchange Server Failure
There are several reasons for the Exchange Server failure. Here some common causes:
- Hardware failure
- Issues with SAN or server storage
- Issues during security or cumulative update installation
- Ransomware or malware attack on the server
- Human errors
- Flood, fire, electrical fault, or any other disaster
- Network issues
- Incompatible or faulty third-party systems
How to Recover Exchange Server 2016 after Failure?
Before you start, you need to find out what happens and how you can retrieve the same configuration and server setup. Most of the Exchange Server configuration is stored in the Active Directory Schema. However, custom configurations, and receive and send connectors are stored on the actual server. After rebuilding the server, you need to reinstall the certificates on the server. So, it’s important to retrieve the certificate from failed server, restore a previous copy of the certificate, or request a new certificate from the certificate authority.
It is also recommended to have the document of original installation in hand. This will help when you reconstruct the server. The custom configurations can be reinstalled or configured, including the custom receive and send connectors. From the document, you can also get the computer name, operating system, IP address, and other machine-related information, which is crucial for rebuilding the Exchange Server.
Preparing for Server Recovery
You can reinstall the Exchange Server using the recover server parameter and rebuild the Exchange Server. Below are the requirements for rebuilding the server:
- Server computer name
- IP addresses of the main and other network interfaces
- Operating system version
- Exchange Server version with the Cumulative Update level
- Drives configuration (size and drive letters)
- Exchange Server installation path
- Copy of the certificates
You can install the operating system and update it to the latest version. However, you need to ensure that the Exchange Server must be at the same Cumulative Update level as the previous one. If the installation path is not known, you can get this from the Active Directory schema using the ADSI Edit. Here’s how:
- Open the adsiedit.msc.
- Connect to the configuration.
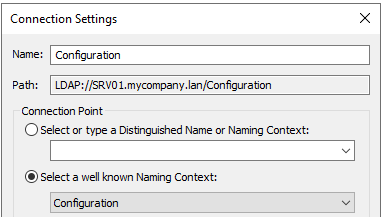
- Expand the following:
- CN=Configuration
- CN=Services
- CN=Microsoft Exchange
- CN=First Organization (or the name specified in the installation)
- CN=Administrative Groups
- CN=Servers
- CN=Server name
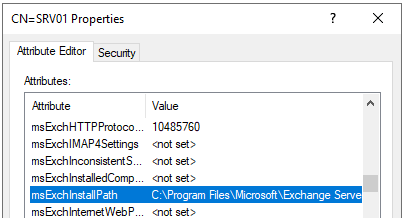
- Right-click on the server and then click on Properties.

- Here, check the msExchInstallPath attribute to get the installation path.
Installing the Exchange Server
Once you have fulfilled all the prerequisites and requirements, you can proceed with the installation of the Exchange Server. The recoverserver command is as follows:
setup /mode:recoverserver /IAcceptExchangeServerLicenseTerms

As you can see, we have added the switch mode with the recoverserver parameter. This indicates that we are rebuilding a lost server and the configuration should be retrieved from the Active Directory schema.
Recovering the Data
This is the most crucial part. You must copy the databases and their respective files to the same location in the same drive and folder names or mount points. Once this is done, the mailbox databases will not mount and show in Dirty Shutdown state. If the databases were not damaged, you can perform the Soft Recovery. Here’s the command:
Eseutil /r e00 /l "<logs location>" /d "<database location>"
After this, you can check the status of the databases with the ESEUtil. Now, the databases should be in Healthy Shutdown state. You can go ahead and mount the databases.
If the Soft Recovery fails, you can use the Hard Recovery. However, it’s not recommended as it purges anything which is deemed as corrupted, resulting in data loss. In addition, there is no guarantee that the database would mount.

If everything fails, the only solution is to restore from the backup. But if the backup is not fully updated, then you need to retrieve the data from the corrupt database or missing transaction logs. You can use a powerful application, such as Stellar Repair for Exchange to recover data from corrupted databases. With this application, you can open the corrupt Exchange database (EDB) files of any version of Exchange Server and granularly export the data to PST and other file formats. You can also export the EDB data directly to a live Exchange Server database with automatic mailbox matching. The application not only processes user mailboxes but can also process user archives, shared mailboxes, disabled mailboxes, and even public folders.
You need to also import the certificate into the newly created Exchange Server.
Import-ExchangeCertificate -FileData ([System.IO.File]::ReadAllBytes(‘<FilePathOrUNCPath>’)) [-Password (ConvertTo-SecureString -String ‘<Password> ‘ -AsPlainText -Force)] [-PrivateKeyExportable <$true | $false>] [-Server <ServerIdentity>]
After importing the certificate, you need to assign the certificate accordingly (see the below example).
Enable-ExchangeCertificate -Thumbprint <certificate thumbprint> -Services POP,IMAP,IIS,SMTP
After this, you need to check that the restore has been done successfully. You should also verify the connectivity with the mailbox databases and also check if all the mailboxes are accessible. Also, check the connectivity of the users and test the inbound and outbound emails. You need to verify that the Microsoft Exchange services are running and all the services are installed correctly.
Conclusion
Above, we have discussed the process to recover or rebuild a failed Exchange Server. Rebuilding an Exchange Server is not a big deal as you can easily retrieve the same Exchange Server configuration from the Active Directory Schema. However, recovering the data is not an easy task, especially if the databases or transaction logs are corrupted. In such a case, the best option is to use an Exchange repair software, like Stellar Repair for Exchange. This application can recover all the data from corrupt Exchange database and export it to a live Exchange Server database in just a few simple steps.