
Summary: This post will outline the occurrences of ‘error 0x8004060C’ while trying to send/receive email from Outlook. It will also discuss the possible reasons behind such an error, and methods to fix it.
Note: If the manual workarounds to fix Outlook error 0x8004060C due to oversized or corrupt Outlook OST have failed OST to PST Converter tool.This advanced utility can extract your important data from OST and convert oversized OST into small PST files.
When trying to perform some actions such as send or receive emails, Microsoft Outlook users may encounter the 0x8004060C error. This error prevents users from deleting old or receiving new emails.
Occurrences of Error 0x8004060C
The error messages reporting 0x8004060C may vary. Following are the different error messages you may receive along with error code 0x8004060C:
Error Message 1: “Task ‘Microsoft Exchange Server – Sending’ reported error (0x8004060C): ‘The message store has reached its maximum size. To reduce the amount of data in this message store, select some items that you no longer need, and permanently delete them.”
Error Message 2: Task ‘EMAIL ADDRESS’ – Sending and Receiving’ reported error (0x8004060C): ‘Unknown Error 0x8004060C’
Error Message 3: “Task ‘Microsoft Exchange Server – Receiving’ reported error (0x8004060C): ‘Unknown Error 0x8004060C”
Reasons behind Outlook Error 0x8004060C
- Outlook data file (OST/PST) has reached its maximum size limit.
- Inaccessible OST file due to synchronization issue between Outlook and Exchange Server
- Exchange Server crash
- Virus or malware attack
While above are some of the probable reasons resulting in Outlook error 0x8004060C, the main reason behind the error is an oversized OST file.
Note: The default size of OST or PST file is 20 GB in Outlook 2007 and 50 GB in Office 365, Outlook 2019, 2016, 2013 and 2010.
You may experience performance issues and delayed email send/receive operations due to increasing file size. It can also result in corrupt or inaccessible Outlook data files (.ost or .pst).
The following sections comprise methods to reduce the size of your Outlook data files, which helps resolve the ‘0X8004060C error’. Also, it suggests what to do if an OST or PST file becomes corrupt or inaccessible.
Methods to Resolve the Outlook Error 0x8004060C
Following are some effective methods that help fix the error by reducing the size of the Outlook data file:
Method 1 – Use Microsoft Outlook Built-in Cleanup UtilityMicrosoft provides a built-in ‘Mailbox Cleanup’ tool that you can use to view the size of your mailbox and folders within it. You can then perform actions that helps reduce the size of your mailbox and OST file.
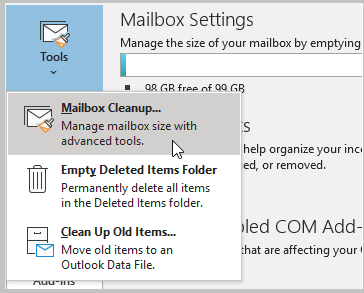
Follow these steps to run the Mailbox Cleanup tool:
- In Outlook, click File > Info.
- Select Tools, and choose Mailbox Cleanup.
- In the Mailbox Cleanup dialog box that opens, perform any of these actions:
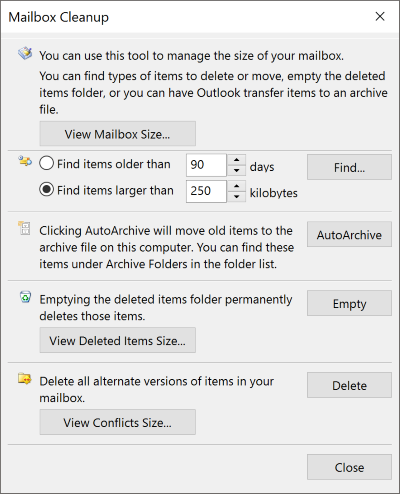
- Select View Mailbox Size to check the total size of your mailbox, and locate items within the mailbox folders that you can delete or move.
- Find items older than and Find items larger than in your mailbox that you may want to delete or move to trim down the size of your mailbox.
- Click AutoArchive to archive old items.
- The ‘Deleted Items’ folder in Outlook may not be set to automatically delete items when Outlook closes. You can check the folder size, by clicking View Deleted Items Size and Empty the Deleted Items Folder. Doing so will ensure that unwanted messages aren’t saved in the Outlook data file.
Note: You can also empty the ‘Deleted Items Folder’ by clicking Tools (or Cleanup Tools), and selecting the ‘Empty Deleted Items Folder’ option.
- View Conflicts Size, and click Delete to empty the Conflicts folder. Emptying this folder will remove any alternate version of your mailbox folder items.
You can keep the size of your Outlook folders under control by moving older items (you may want to use in the future) in an archive.
You can archive an OST file, by creating a new PST file and dragging and dropping the OST file folders into the new file.
You can automatically archive a PST file by using the ‘AutoArchive’ feature, and here’s how:
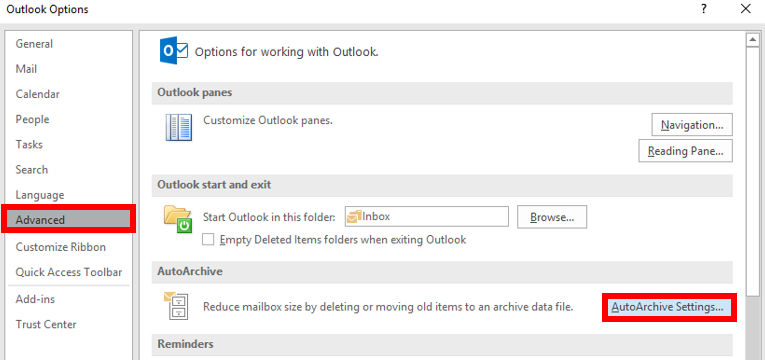
Step 1: From your Outlook account, click File > Options.
Step 2: In the Outlook Options window, click Advanced, and then click AutoArchiveSettings under ‘AutoArchive’.
Step 3: In the AutoArchive window, do the following:
- Check the ‘Run AutoArchive every n days’ box, and then specify the number of days for which you want to run AutoArchive.
- You can also choose other options to archive mailbox folders. Next, browse and select the file to ‘move old items to’.
- Click OK.
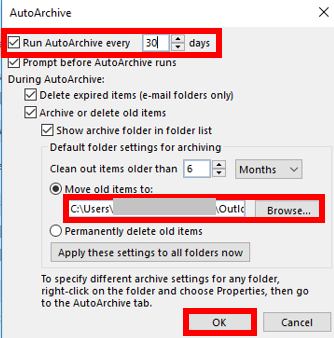
Note: If your mail profile is connected to an Exchange Server, ‘Archive’ and ‘AutoArchive’ options might not be available in the profile. Also, check if your organization has a mail retention policy, as it can override ‘AutoArchive’. Contact your system administrator for more information.
Method 3 – Split Outlook Data FileIf you’re using multiple large-sized Outlook data files, then the above methods might not be efficient in reducing the file size. In that case, use a professional tool that allows splitting of large-sized, multiple Offline data files into smaller and manageable files. For more information, refer to this link.
What If Outlook Data File Has Turned Corrupt?
As discussed above, the growing size of the Outlook Offline Data File (.ost) or Personal Storage File (.pst) can turn the file corrupt. Fortunately, Outlook provides a built-in repair utility called the ‘Inbox Repair Tool’ or Scanpst.exe to deal with the OST/PST corruption issues.
In case, you have a corrupt OST file and you are unable to resolve it, try to re-create the .ost file. After all, an OST file is the exact replica of your Exchange mailbox. Therefore, you don’t require backup to restore PST, just recreating the OST file can resolve the problem.
Steps to Re-create an Offline Outlook Data File (.ost)Note: These steps will work only if you can connect to an Exchange email account.
Delete the OST file and it will get re-created the next time you will open Outlook. To re-create the file manually, follow these steps:
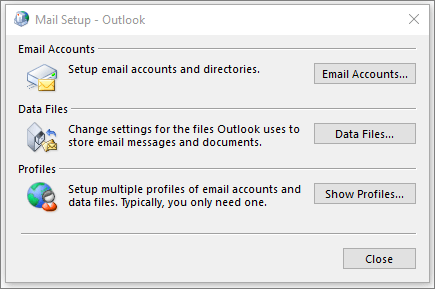
Step 1: Close Outlook. Open Control Panel, and Mail icon.
Step 2: In the Mail Setup dialog box, click Show Profiles option.
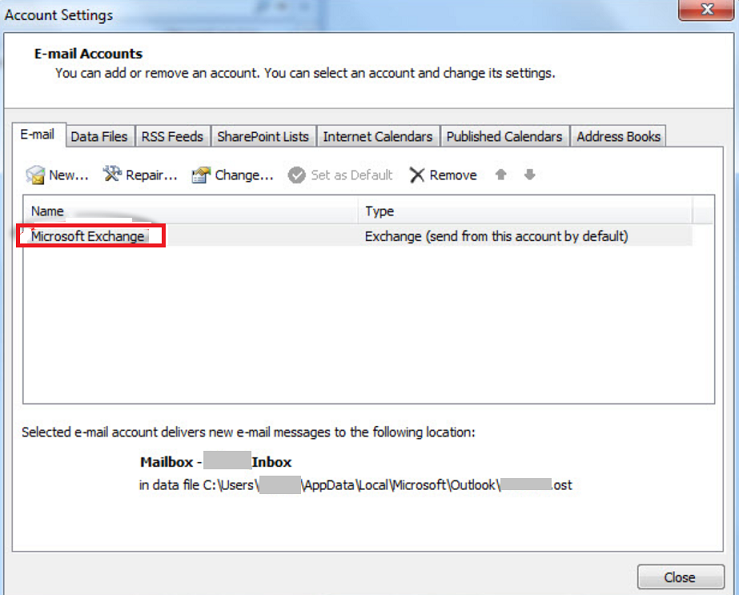
Step 3: In the window that appears, choose the profile name you want to recreate, and then select Properties.
Step 4: In the Account Settings box, select an Exchange account from the E-mail tab, and then click Change.
Step 5: Uncheck the Use Cached Exchange Mode checkbox, and then select More Settings.

Step 6: Now, select the Advanced tab and click Offline Folder File Settings.
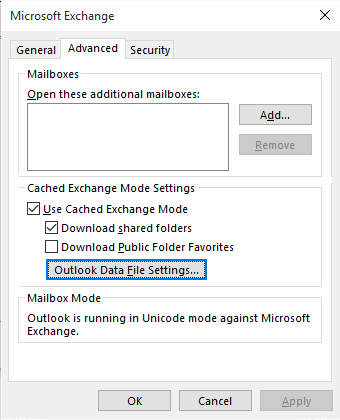
Step 7: Click Disable Offline Use, and in the dialog box that opens, click ‘Yes’.
Note: Disable Offline Use will only become clickable when the Use Cached Exchange Mode checkbox is unchecked.
Step 8: Select Offline Folder File Settings again, and click OK.
Step 9: In the dialog box that pops-up, click ‘Yes’.
Step 10: Now, select the Use Cached Exchange Mode checkbox from Cached Exchange Mode Settings, and then click OK.
Step 11: Click Next and then Finish.
Step 12: Close the Account Settings and Mail Setup dialog boxes.
Remember, the process to re-create an .ost file will vary based on the Outlook version you’re using.
Steps to Repair Outlook Data File with the help of Scanpst.exeIf you cannot re-create your corrupt OST file, try repairing the file by using the ‘Scanpst.exe’ tool:
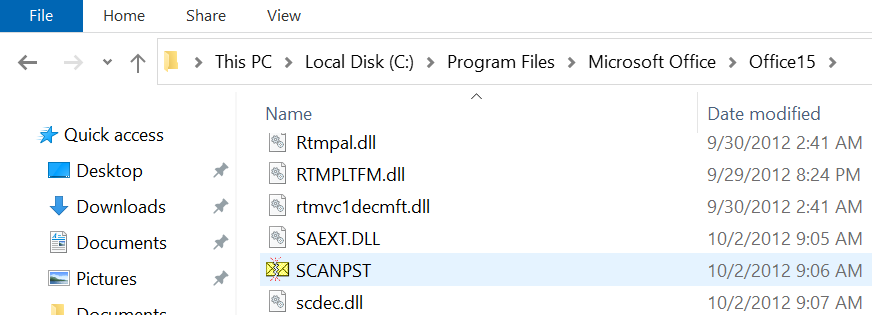
Step 1: Exit Outlook.
Step 2: Find Scanpst.exe on your system. It can be usually found at the location <disk drive>:\Program Files\Microsoft Office\<your office version>).
Note: The location of Scanpst.exe may vary depending on the Outlook version you’re using.
Step 3: Double click SCANPST.
Step 4: In the dialog box that appears, browse the corrupt PST file (or OST file) you want to scan.
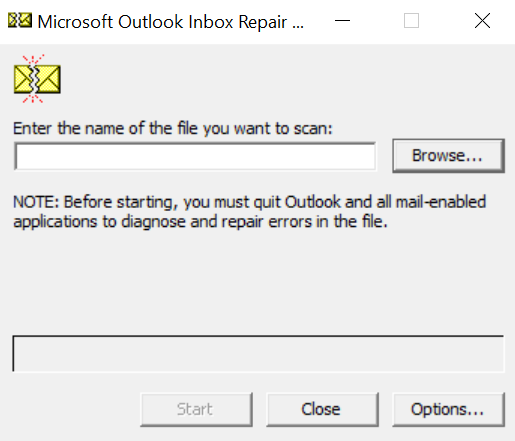
Step 5: Once the file is selected, click Start to initiate the repair process.
Step 6: If any errors are found, select Repair to fix the errors.
Note: You may need to run the Microsoft built-in repair utility several times to fix corruption errors in OST/PST files. Also, the tool may fail to repair severely corrupt files.
Best Alternative to Fix Outlook Error 0x8004060C
If the Outlook error 0x8004060C still persists or you cannot restore corrupt/ inaccessible OST (or PST) file, try converting the OST file into PST file by using Stellar Converter for OST software. It is a powerful software that helps overcome all the problems associated with manual methods. It quickly converts orphaned or damaged OST file into Outlook importable PST file, without any technical assistance. It can restore all the mailbox items, such as emails, attachments, contacts, notes, etc. and convert them into PST format, while keeping the original data formatting intact. It also helps save the converted OST file at a desired location.
Hello Admin Team,
Manual solution didn’t work and the error is still prompting while I attempt to send an email. Is my OST file corrupt, or I’ve wrongly changed the Outlook settings. Any suggestion.
FYI, OWA is working fine.
This is good if OWA is working, at least you can access you inbox online. I’m not sure if you’ve changed settings in your Outlook profile but if the error message still prompts on your screen even after using all the manual procedures including ScanPST; I’m sure your OST file is badly corrupt that can not be repaired using free methods.
All you need Stellar OST to PST Converter (http://www.stellarservertools.com/ost-pst-converter.php) to repair corrupt OST file and recover all the data into PST format. Later, you can import this PST to Outlook and check again for further issues.
I hope it will resolve the Outlook send/receive error permanently!
Resolved.
Thanks 🙂
Useful Reference.
Thank YOU!
You can also subscribe to our Exchange blog to receive the latest updates.